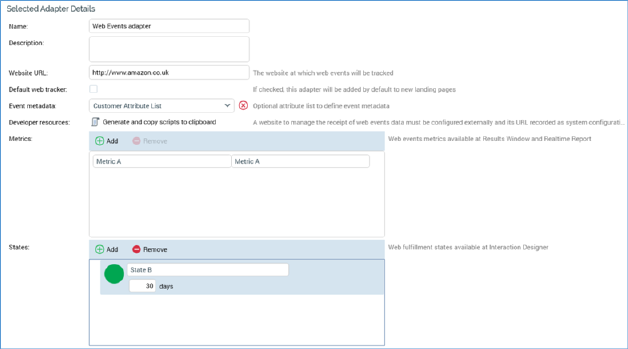
When a web events adapter is selected in the web adapters list, the Selected Adapter Details section contains the following updateable fields:
•Name: a mandatory text field that can be a maximum of 100 characters in length.
•Description: an optional text field that can be a maximum of 1000 characters in length.
•Website URL: this mandatory field can be a maximum of 1000 characters in length. Web Events parameters are attached to all instances of the specified URL within the offer channel content (matching when the string as stated is found in the URL). Note that the following characters are forbidden: [space], '?' and '&'.
•Default web tracker: a checkbox, unchecked by default. If checked, the adapter will be automatically added to any newly-created landing pages. A validation error is raised at save if more than one default web tracker of a given type of web adapter has been defined.
•Event metadata: this property allows you to optionally select an attribute list, which can be used when configuring Event Metadata criteria in a Web realtime decision. A dropdown property, it lists all configured non-Placeholder attribute lists. Nothing is selected by default. Having chosen an attribute list, you can clear your selection.
•Developer resources: clicking the Generate and copy scripts to clipboard allows a web developer to generate scripts that can then be inserted at appropriate positions in an external website. Note that a website to manage the receipt of web events data needs to be configured externally, and its URL recorded as system configuration setting WebEventTrackingAddress. The button is not available until the web adapter is saved.
Two scripts are created and copied to the clipboard:
o Set Cookie Script: this script sets cookies on the machine of the person viewing the website, which are based on the URL parameters appended to the URL which he or she traversed to browse to the site.
o Send Metric Script: this script is used to call the web events website to advise of metric or state updates.
A confirmatory message is displayed post-copy. Note that a warning is displayed if WebEventTrackingAddress has not been set.
•Metrics: these represent cumulative numerical values collated at the website, even across several visits; for example, Total Sales Value. Web event adapter metrics are listed in a grid, above which is displayed a toolbar that exposes the following options:
o Add: invocation of this option adds a new metric to the grid. Its default name is 'New metric'. If a metric of that name exists already, an integer is appended, and may be incremented if required. The new metric’s default Web parameter name is blank.
o Remove: this option is only available if a metric is selected. Invocation removes the metric from the grid.
The Metrics grid, contains the following columns:
o Name: a metric’s name is mandatory and may be a maximum of 100 characters. The name must be unique within the web events adapter.
o Web parameter Name: mandatory, and a maximum of 100 characters. The web parameter name must match a value configured within a tag at the website, is case sensitive and must be unique within the web events adapter.
o [Remove button]: displayed when hovering over a metric. Invocation removes the metric from grid.
•States: a state represents the number of visitors that assume a given state at the website – for example, ‘Made a Purchase’. States are displayed in a treeview, above which is displayed a toolbar exposing the following options:
o Add: invocation adds a new, unconfigured top-level state to the bottom of the top level in the treeview. Its default name is 'New initial state'. If 'New initial state' already exists, an integer is appended and may be incremented if required. The newly-added state appears as restored.
o Remove: this button is enabled when a state is selected in the treeview. Invocation removes the selected state from the list. Any descendent states are also removed.
The States treeview may contain multiple top-level states. States are shown as treeview nodes. Initial states can contain child states; however, there are no functional ramifications for parent/child relationships, and they are provided to allow you to organize states in a logical manner. You can nest multiple levels of child state if you wish.
When the interface is displayed initially, existing initial states are shown as rolled up. All states' details are hidden. You can expand or roll up states as required. When expanded, child states are shown as indented. When a state is selected, the cursor occupies full available treeview width.
A state contains the following:
o Positive/Negative/Transitional state icon: on hovering over the icon, a menu is displayed, allowing you to change the property:
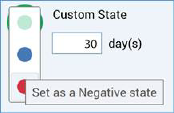
Note that the definition of a state as Positive, Negative or Transitional is purely to add comprehensibility, having no functional impact.
o Name: mandatory, and a maximum of 100 characters. A state’s name must be unique within a web events adapter.
o Duration: the length of time after channel execution within which the state can be assumed.
o Add a new Child State: this button is shown to the right of the state at hover. Invocation adds a new, child state to the bottom of the list of the current state's children. The new child state’s default name is 'New child state'. If 'New child state' already exists, it is called 'New child state 2'. This number may be incremented if required.
o Remove: this button is shown to the right of the state at hover. Clicking it removes the state from the adapter.
On save, if a state has been added, or an existing state's database field has changed, a Validate Audience Definitions job is created, and displayed in the My Jobs Dialog. Full details of the job and Dialog can be found in the My Jobs documentation. When complete, this job adds database field columns to all audience definitions’ offer history tables as appropriate.