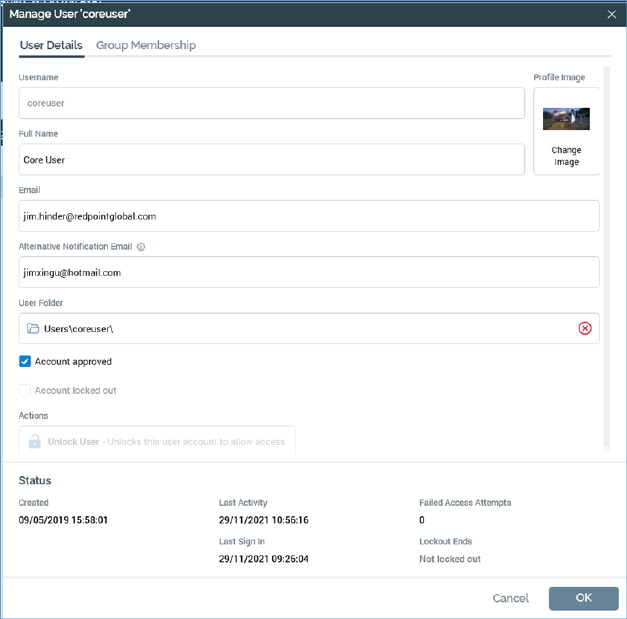
You can initiate the management of an existing user by double-clicking a user in the existing users list. Management of an existing user is carried out in the Manage User modal dialog.

The dialog contains a tab set, which contains two tabs – User Details and Group Membership – and a Status panel at the bottom.
The User Details tab displays a user's properties.
All properties are writeable unless otherwise advised.
•Username: read-only; a user's username is defined at creation and, once chosen, cannot be updated.
•Full Name
•Profile Image: you can assign an image to an existing user. The image is displayed in the default Home Page and is used when displaying pulses in pulses widgets and the Pulses Window. A default user image is shown initially. You can change this image: this displays the Choose Profile Image Windows file system dialog (only image files are shown by default). You can select an image (an attempt to select a non-image file results in display of a warning message). You can cancel the dialog, which retains the original image. Following selection of an image, it is displayed in the Manage User dialog, and is resized automatically to icon size.
•Alternative Notification Email
•User Folder: as created alongside the user. The full file system path is shown. If desired, you can overwrite the default folder by browsing for another via the Choose Folder dialog; if you do so, only folders to which you have access are shown. If you select a folder to which the user being managed does not have access, a warning message is displayed. You can also clear the user folder. User folder is mandatory.
•Account approved
•Account locked out: read-only; a user's account must be unlocked using the Unlock user button.
•Actions: exposing an Unblock User button, which is enabled if a user's account is locked. Clicking this button unlocks the user's account.
Please see Create New User for details of the Group Membership tab.
A read-only Status panel is displayed at foot of the dialog, and displays the following:

•Created: the date and time of the user's creation.
•Last activity: the date and time at which activity by the user was last recorded.
•Last login: the date and time at which the user last logged into RPI.
•Failed access attempts: a count of the number of failed attempts to sign in by a user is maintained. This count is set to 0 when a user successfully logs in, or when he or she is locked out.
•Lockout ends: if a user enters incorrect credentials more than the number of times defined by cluster configuration setting MaxFailedAccessAttemptsBeforeLockout, her or his account is locked out for a time period defined by setting DefaultAccountLockoutTimeSpan. After this period the account is unlocked, and the user may sign in once again. The Lockout ends property displays the date and time at which a locked out user’s account is scheduled to be unlocked.
You can click OK to finish updating the user's record. Doing so causes the data you have entered to be validated; if any validation issues exist, they are displayed as warnings and you must resolve them before the user can be updated. If no validation errors are present, the user's details are updated within the operational database (note the contrast with other configuration interfaces, within which the Save button is used to persist changes). The user's updated details are displayed within the users list in the User Management interface.
You may also cancel updating the user. If you cancel having made changes, a dialog queries whether wish to save the changes made to the user.
•Yes saves changes made to the user and closes the Manage User dialog.
•No loses changes made to the user and closes the Manage User dialog.
•Cancel retains the Manage User dialog on display.