
The Import Assets overlay is used to facilitate the simultaneous import of a number of files (e.g. images or HTML files) to create RPI assets based on the same.
It contains the following:
•Choose files to Import section: this section contains the following:
o Toolbar: the toolbar exposes the following functionality:
§ Add File: clicking this button displays the Import Asset Files... Windows file system dialog. You can select from the following File types: Image Files (the default), Text Files or HTML Files. Choosing a file adds a row to the dialog, with a name that defaults to the name of file in question, less its extension.
§ Remove File(s): this button is displayed when one or more files are selected in the Choose files... grid. Clicking it removes the selected files without displaying an 'Are You Sure?' dialog.
o Grid: when empty, a message is shown:

The grid lists the files you have selected to import.
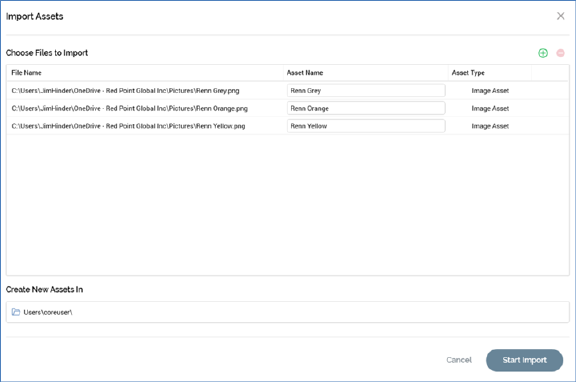
It contains the following columns:
§ File Name: this read-only field displays the full path of the file.
§ Asset Name: this field is writeable and can be a maximum of 100 characters. It is the name of the file to be created in the RPI file system. Note that you cannot start the import of files until all rows' Asset Names have been provided.
§ Asset Type: this read-only field is populated automatically on the addition of a row to the grid. It can be set to one of Image Asset, Text Asset or HTML Asset.
If you wish, you can drag one or more files from an independent Windows Explorer Window and drop them directly into the grid. One row is created for each file dropped in this way. Note that the same file can only be present in the grid once.
You can also drag in one or more folders from Windows Explorer. When you do so, any files therein, or within nested subfolders, are added to the list. The dragging in of combinations of files and folders is similarly supported.
•Create new assets in: a folder, which defaults to your user folder. You cannot commence importing files until a folder has been provided. You cannot select an external folder.
•When Importing: this property allows you to specify where, when importing a file referencing other assets, the latter will be created in the RPI file system. A dropdown field, it exposes the following values
o Import all files into the same destination folder: the default. When importing an HTML file referencing other assets imported at same time, all assets are created within the folder specified at the Create New Assets In property.
o Import files and maintain the source folder structure: When importing an HTML file referencing other assets imported at same time, sub-folders mirroring the Windows file system are created in the RPI file system, and the referenced files are created therein.
•Cancel: clicking this button closes the overlay.
•Start Import: this button allows you to start the process of importing the specified files in order to create assets based on them.
Note that a slight delay might occur prior to the button's being activated following the addition of one or more file(s) to the grid.
Clicking the button displays a progress overlay. Clicking Cancel in this context results in the completion of the current upload; no further uploads are performed thereafter.
Following a successful import, an information message advises that assets have been saved. In the event of issues having occurred during the import process (e.g. a file larger than the maximum permissible size (as defined by system configuration setting MaxFileAssetUploadSize) being uploaded), a dialog listing the errors is displayed.
When you import one or more HTML assets that contains link(s) to one or more images, a message is displayed post-successful import to advise that images referenced by the HTML asset were also created as image assets. Note that links within imported HTML assets must be relative.
Image assets are created for each <img> tag in an HTML asset and are saved in the same folder as the HTML asset. Assets are named as per images' filenames. Any RPI-supported image properties are set appropriately.
If an image asset with the same name already exists in the import folder, the image asset is not imported and a warning dialog is shown. If more than one imported HTML assets reference the same image, the image asset is only created once.
A History comment is added at each imported asset to indicate the method by which it was created.