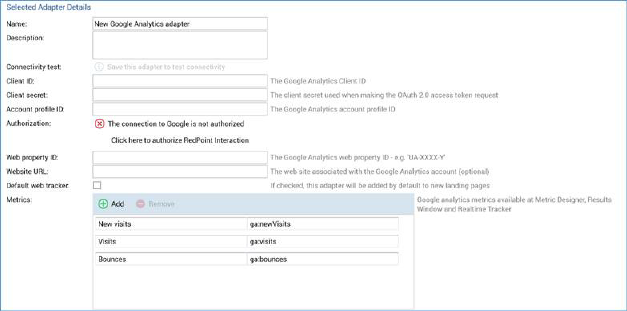
When a Google Analytics adapter is selected in the web adapters list, the Selected Adapter Details section contains the following updateable fields:
•Name: a mandatory, textual field that may be a maximum of 100 characters in length. Name must be unique across all web adapters.
•Description: an optional field that may be a maximum of 1000 characters.
•Connectivity Test: this button facilitates determination of valid combinations of Google Analytics metrics. If any unsaved changes exist, the button is disabled, and its text reads 'Save this adapter to test connectivity'. If no unsaved changes are present, the button is enabled, and its text reads 'Create new job to test this adapter'.
Clicking the button creates a Connectivity test job and displays it in the My Jobs Dialog. Full details of the job and Dialog can be found in the My Jobs documentation.
•Client ID: this mandatory property represents the client’s unique Google Analytics ID.
•Client secret: this mandatory property is used to capture the client’s Google Analytics secret, which is used to when making the access request to Google.
•Account profile ID: the Google Analytics account profile ID. The field is mandatory and can be a maximum of 100 characters.
•Authorization: for a Google Analytics adapter to be used by RPI, it must be authorized.
A label displays the adapter’s current authorization state. It is accompanied by a button as follows:
o Prior to the adapter’s being authorized, the button displays the text ‘The connection to Google is not authorized’. You can click the button to display a Google Sign in page in your default web browser. On entering valid Google credentials and clicking Sign in, select the requires access permission and click Continue at the next interface.
An authorization code will then be displayed, which you can copy to the clipboard. Having obtained an authorization code from Google, a Code field is displayed at the property, accompanied by a Submit code button.
Paste the code into the field provided and click Submit code. If the code is correct, the Google Analytics adapter is deemed to have been authorized.
Following the adapter’s authorization, the text ‘The connection to Google has been authorized’ is displayed. The adapter has now been authorized and can be saved (note that it is not possible to save an unauthorized Google Analytics adapter).
•Web property ID: provision of this Google-supplied value, with a format of ‘UA-XXXXXXXX-1’, is mandatory.
•Web site URL: the web site associated with the Google Analytics account. Provision of this value is optional, and the field supports a maximum of 1000 characters. If set, the Google Analytics parameter is attached to URLs in an email offer that contain the specified sequence of characters. If not set, the parameter is attached to all URLs in the email content. Note that the [space], ? and & characters are prohibited in this field.
•Default web tracker: a checkbox, unchecked by default. If checked, the adapter will be automatically added to any newly-created landing pages. A validation error is raised at save if more than one default web tracker of a given type of web adapter has been defined.
•Metrics: this grid allows you specify the subset of Google Analytics metrics that will be made available at the Results Window.
The grid contains the following:
o Toolbar:
§ Add: invocation of this option adds a new metric to the grid. Its default name is ‘New metric’. If this value already exists, an integer is appended to ensure uniqueness (this number can be incremented if required). The new metric’s default Google Analytics name is 'ga:'.
§ Remove: this option is only available if a metric is selected. Invocation removes the metric from the grid.
o Columns:
§ Name: mandatory, and a maximum 100 characters. The metric’s name must be unique within the Google Analytics adapter.
§ Google Analytics Name: mandatory, and a maximum of 100 characters. The metric’s Google Analytics name must be unique within the Google Analytics adapter, and must begin with 'ga’. Note that it is not valid to specify the 'ga:visitors' metric. The value supplied must consist only of alphabetic and/or numerical characters.
§ [Remove button]: this button is displayed when hovering over a metric. Invocation removes the metric from the grid.
Three default metrics are provided to get you started:
o New visits/ga:newVisits
o Visits/ga:visits
o Bounces/ga:bounces
It is mandatory to provide at least one metric or goal within a Google Analytics adapter.
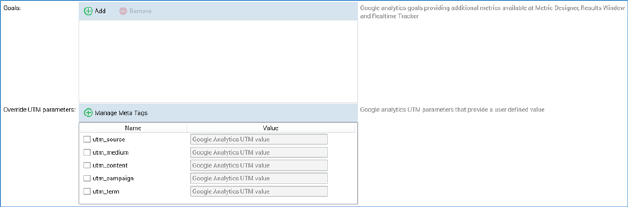
•Goals: Google Analytics goals represent just that – demonstrable outcomes that may occur during a visit to a website. Typically, goals are associated with a sales funnel; a landing page may be followed by a sequence of informational and interrogative pages before ending with a goal – for example, confirmation that a purchase has been made successfully. Each page in such a sequence can be assigned a unique identifier within the Google Analytics interface, and the reference numbers utilized within a Google Analytics adapter’s goals to represent outcomes achieved during a website visit. Each such goal provides three metrics that can then be accessed at the Results Window:
o starts (indicating that a visitor embarked upon the sales funnel journey)
o completions (indicating successful completion of the journey)
o value (a financial amount determined by multiplying the number of successful completions by a value configured directly within Google Analytics’ own interface)
Google Analytics goals are managed in a grid. The grid contains the following:
o Toolbar:
§ Add: invocation of this option adds a new goal to the grid. Its default name is ‘New goal’. If this value exists already, an integer is appended to ensure uniqueness. This number can be incremented if required. The new goal’s default Goal Index is 1.
§ Remove: this option is only available if a goal is selected. Invocation removes the goal from the grid. Remove is not protected by an ‘Are You Sure?’ dialog.
o Columns:
§ Name: a mandatory field that can be a maximum of 100 characters in length. A goal’s name must be unique within the Google Analytics adapter.
§ Goal Index: a mandatory field, Goal index must be an integer, and must be greater than 0. It must also be unique within the Google Analytics adapter.
§ [Remove button]: This button is displayed inline when hovering over a goal. Invocation removes the goal from the grid. Remove is not protected by an ‘Are You Sure?’ dialog.
In contrast to metrics, default goals are not provided.
It is mandatory to provide at least one metric or goal within a Google Analytics adapter.
•Override UTM parameters: this property allows you to override the names of the standard Google UTM parameters, which are added to tracked URLs by Google Analytics.
The property consists of a toolbar and a list.
The toolbar exposes a single button:
o Manage Meta Tags: when this button is clicked, the Manage Meta Tags dialog is shown.
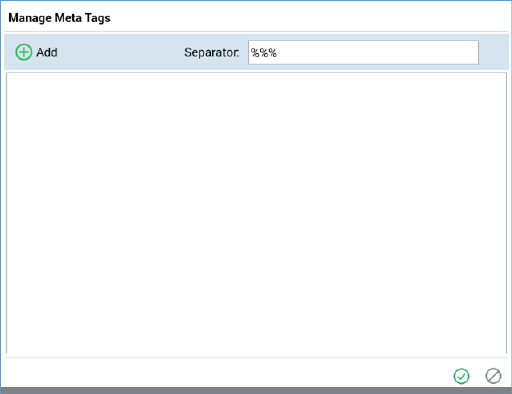
The dialog allows you to manage meta tags, which can later be assigned to UTM parameters in the Override UTM parameters list.
The popup contains a toolbar, list and buttons.
§ Toolbar: exposing the following:
§ Add: clicking this button adds a new, unconfigured meta tag to the list.
§ Separator: this mandatory text field allows you to define a sequence of characters that will be used to separate meta tags. It defaults to the value '%%%'.
§ List: each defined meta tag is displayed in the list. For each meta tag, a Meta Tag Name and Meta Tag Value must be defined. An inline Remove button is shown on hovering over a meta tag; clicking it removes the meta tag without displaying an 'Are You Sure?' dialog.
§ OK: clicking this button saves changes to meta tags and closes the dialog.
§ Cancel: clicking this button abandons changes and closes the dialog. Clicking off the dialog has the same effect.
The list presents a list of UTM parameters. Each is accompanied by a checkbox. If you check a UTM parameter, its accompanying Value field is enabled. The field is mandatory and accepts a value of up to 128 characters in length.
If UTM parameters are overridden, the values provided are substituted at runtime for their ‘utm_’ equivalents (e.g. ‘utm_campaign=123’ becomes ‘Custom_value=123’).
‘utm_term’ is only included in URLs when overridden.
Meta tags can be managed at a UTM parameter using inline Select and Clear buttons shown to the right of each selected UTM parameter on hover.
o Add: clicking this button displays the Select Meta Tags dialog. The dialog lists all configured meta tags. You can select meta tags by checking the checkboxes to the left. OK and Cancel buttons are provided at the bottom of the dialog. On selecting meta tags, they are displayed at a UTM parameter's Value as '[Tag Name 1][Separator][Tag Name 2]...'.
o Clear: you can use this button to clear any meta tags assigned at a UTM parameter.
If UTM parameters are not overridden, the default values provided at runtime are as follows:
o utm_source: RPI
o utm_medium: channel's delivery method name e.g. Email
o utm_content: channel execution ID. If a test send, the default value is 0.
o utm_campaign: offer activity name