Trigger constraints are available at all four trigger types, and also within the wait for event activity. They are shown within the General tab within a trigger’s configuration panel
When you elect to display trigger constraints within a configuration panel, the button toggling display of trigger details and constraints reads Show trigger.
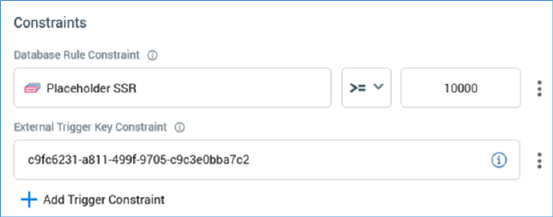
The trigger constraints panel contains the following:
•Constraints list: a list of database rule and external trigger constraints.
If a database count constraint, the following properties are shown:

o Information icon: hovering over the small info icon to the right of the constraint’s title displays this tooltip:

o Selection rule: mandatory. You can browse those folders within the RPI file system to which you have access to choose a selection rule; you can also drag a selection rule from the toolbox.
Once you have chosen a selection rule, you may clear it. You can also open the latest version of the selection rule. If the Rule Designer is already open, the rule is shown there. If it is not, a new instance of the Rule Designer is opened to display the rule.
Use of selection rules with auxiliary database resolutions is supported in this context.
o Operator: you can choose an operator for the constraint using a drop-down list, which defaults to >= (more than or equal to).
o Value: a mandatory integer, which defaults to 0.
o Options: exposing a single Remove option.
If an external trigger constraint, the following properties are shown:

o Information icon: hovering over the small info icon to the right of the constraint’s title displays this tooltip:

o GUID: a system-generated value that is unique to the workflow. The GUID is used by a caller to identify the specific trigger constraint that is to be satisfied. Note that if you save an interaction as another name, a new GUID is generated.
o Information icon. Clicking the icon displays a dialog, which describes how the trigger constraint can be satisfied (using either an HTTP post or a SQL Server stored procedure):
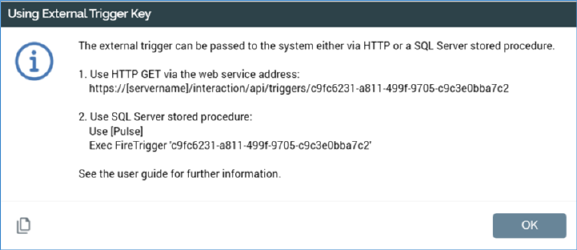
An external application can call RPI, using either of the methods described, to satisfy the trigger constraint.
You can copy the contents of the dialog to the clipboard.
o Stop checking at: only relevant if a manual, scheduled or activity state trigger. This date/time value is optional, and no default is set. The field can be populated manually or by using a calendar control.
The property is accompanied by an information tooltip:
o Options: exposing a single Remove option.
•Add Trigger Constraint: invoking this button allows you to select the type of trigger constraint you wish to add from a menu (database count or external trigger constraint). Note that, when configuring a wait for event, you may only add database count constraints. Invocation creates a new, unconfigured constraint of the appropriate type within the constraints list.